My hats (head and hair, really) tend to run large. If you need it much smaller and going down a needle size won't do, the heart pattern has an 8 stitch repeat and can be adjusted accordingly.
For a limited time, you can get a kit to make this yourself that includes the yarn and lots of other fun goodies! Find it here.
Scroll down to find a large-print version.
Perhaps the world knows no shortage of sheep-motif patterns, especially sheep hats. But, the world also knows no shortage of sheep - did you know there’s 1.266 billion of them in the world? And yet, like sheep hats, we just can’t seem to get enough of their cuteness! So go on, don’t be sheepish, and knit a bucket-style hat full of frolicking lambs.
Sizing note:
A few early finishers have noted the hat runs large. This would make sense since my head runs large haha! Feel free to size down a needle size if you would like a snugger fit.
Materials:
Size 6 double pointed needles (5) or short circulars (or long circulars for magic loop)
1 Skein Briggs and Little Heritage (215 yards per 4 ounces) Fern or color of your choice
Approx 30 yards Heritage Black
Approx 30 yards Heritage Bleached White
Cast on 120 stitches, distributing evenly amongst 4 double pointed needles, joining to work in the round.
Complete 14 rounds of seed stitch by doing the following:
Round 1:*Knit 1, Purl 1* repeat between ** to end
Round 2:*Purl 1, Knit 1* repeat between ** to end
The brim of the hat will be tucked under and sewed. It is meant to retain a rounded, tubular shape. For a wider brim, consider adding more rounds and using a thin strip of stuffing when finishing.
Begin and complete chart
Knit 6 rounds even
Begin crown shaping:
Round 1: *Knit 10, knit 2 together* repeat between ** around.
Round 2 and all even rounds: knit
Round 3: *Knit 9, knit 2 together* repeat between ** around.
Round 5: *Knit 8, knit 2 together* repeat between ** around.
Round 7: *Knit 7, knit 2 together* repeat between ** around.
Round 9: *Knit 6, knit 2 together* repeat between ** around.
Round 11: *Knit 5, knit 2 together* repeat between ** around.
Round 13: *Knit 4, knit 2 together* repeat between ** around.
Round 15: *Knit 3, knit 2 together* repeat between ** around.
Round 17: *Knit 2, knit 2 together* repeat between ** around.
Round 19: *Knit 1, knit 2 together* repeat between ** around.
Round 21 and 23: Knit 2 together around.
Cut yarn and pull through remaining stitches. Sew top closed, sew in ends, block (on a balloon is my advice), sew the brim up and under, go forth and frolic.
Pattern by Maritime Family Fiber, Lacie Glidden, 2023 all rights reserved.
]]>It does happen from time to time though. On one such occasion, a young mother had given birth. All seemed to be going well, but we noticed the wee lamb, big-boned with generous white splotches on his face, didn’t seem to be thriving so well. At a respectful distance my dad and I watched behind the fence. He shook his head as we watched the tottering lamb nursing clumsily.
“He’s keen, but I just don’t think she has the milk. What do you think?”
Whether he actually sought my advice or simply wanted me to feel valued, Dad often would ask me my opinion on husbandry issues. I pondered for a moment, not wanting to seem too eager to rip the lamb right off and have another pet for myself.
“I think -” I began “ We should give them a day or two.” Dad nodded.
“Probably wise.” I beamed inside that my opinion was deemed wise, and we set off toward the farmhouse, Dad calling the collies back.
But with watchful waiting, the pair didn’t get much better. The lamb still seemed hungry, and the mother’s udder underwhelming. We decided that he might need to be hand-reared after all. I tried to hide my excitement, obviously unsuccessfully.
“You know, Lacie. Wayne called me again this year…” He began. I instantly bristled. His friend Wayne had three kids, similar in age to me, and each year they had called, pining for a bottle baby to call their own. Of course, I had selfishly declined the offer with enough stubbornness that my Dad had to let down his friend as I hoarded all the babies for myself.
“I really think we ought to think about letting them have a turn, you know.”
I wanted to fight, but the truth was that he was right. Not only did I already have several Cheviot bottle babies already, but I was expecting a litter of angora bunnies any day now, and I had my studies to think of. It was a lot of responsibility for a seven year old. After I reluctantly agreed, we captured the lamb, stomach tubed him, and gave Wayne a call. The children were ecstatic as they came to pick him up, showering him with affection and naming him Daniel.
He was quite reluctant to leave his mother, which was hard to see. However at four days in, leaving them together would have most certainly resulted in a dead lamb being found in the pasture on morning rounds.
A little time passed and my jealousy assuaged. I had my hands full of lambs and baby bunnies to distract me anyway. After a few weeks, we got a call from Wayne again. He and his family were going on vacation, and needed a lamb-sitter. I happily agreed - what luck! I would get to spend some time with the woolly lamb after all.
I soon discovered that Daniel had not taken so well to his status as bottle lamb. Most of the time a lamb can be bottled trained within a few feedings, but the longer they are on their mother the harder it becomes to train them. After a month, Daniel still wasn’t taking the bottle willingly, and he showed his displeasure by peeing on demand on whoever was trying to feed him. I discovered this the first day the hard way. In the small four-panel pen, I still had to chase Daniel down to catch him, and as I held him he kicked obstinately the entire time. I forced his jaw open and quickly tucked the bottle in his mouth, and milk drooled copiously down his chin and all over me as well. Sure, he swallowed a few drops, but I had no idea what had kept him fed and strong the past month with this sort of behavior.
After a few minutes of struggle, he peed on me. This is fairly typical for lambs as feeding elicits elimination sometimes. What’s not typical is that, after pausing the feeding to go get changed into my second farmiest clothes, he immediately peed on me again. Another time, I trudged up to my room and got changed, starting to become frustrated. But I wasn’t one to let a little lamb get the best of me, so as many times as he peed on me, I changed my clothes again. Why I didn’t just wait until the feeding was over, I’m not sure, but the better part of the day passed that way: attempting to feed him and changing my clothes.
My closet became bare, and eventually all that was left was my frilly, fluffy, puffy, handmade Easter dress that my mother had sewn me. Seeing no issue with this, I put it on and obstinately headed back to feed that little bugger.
Me wearing a good example of the fluffy dress.
But this time - he peed on me again. Now I was really in a bind. No clothes, and still a hungry lamb. I brainstormed a plan. From the kitchen cupboard I collected two plastic shopping bags, the disposable kind, cut holes for my arms and head in one and two holes for legs in the other and tied the handles together. It worked surprisingly well, and was in fact waterproof as well. Daniel dejectedly finished his bottle, peeing all the while, knowing he’d been beat.
It was about this time that Dad came back from work, and questioned my outfit choice. I explained what had happened during the day, and he stifled a laugh. After that, we did Daniel’s owners the favor of training him to drink out of a bucket. They confirmed this peeing trick was a daily struggle, and never asked us again for any more bottle babies. I did feel bad that their introduction to cossets was so disappointing, but also relieved that Daniel hadn’t become my permanent charge.
]]>
If you have been following the Sylvi coat saga, perhaps you even started one yourself in our ambitious year-of-the-Sylvi-coat, you may have wondered what the heck happened to Lacie who was supposed to be leading us?
“Was it the baby?” you may ask. “Or did she just forget?”
Is it her fault?
Worse than both of those excuses, I should say, I made an irredeemable dyelot error.
You see, I chose the lovely Sheep’s Grey for my coat, a natural fleece color full of the richness of minimally processed sheep’s wool. Its hand and hue are not far off from patting a sheep’s wooly back itself. BUT because of this unique feature, you MUST be sure to set aside enough of the same dyelot to complete your project - which is what I did, until one day when someone asked for some Sheep’s Grey and I said oh, I thought I didn’t have any but look, I have some right here. Not sure why it’s set aside, but you can have it. Sheesh. It occurred to me after I told her she could have it that I had set it aside to finish my Syvli.
The lovely Sheep’s Grey
Oh well, I said. I’m sure the next lot won’t be far off.
WRONG!
Ever-so-wrong!
The next lot was much browner, being as the next sheep it came off was browner. Can’t blame the sheep for that.
So now that the truth is out, how exactly do I plan to remedy this? Well, I had completed the sleeves and was just getting into the rhythm of the back, so while I considered fading the color in (knitting one row in one lot and the next in the other lot, a very handy trick) I believe the color difference is too stark, and the shoulders would stand out.
After much soul-searching, I decided to frog and start over, probably in a different color. Most likely instead of dealing with my poor decision right away, I will cram it into a tote and one day in 5 or 10 years I’ll pull it out and laugh at myself (yes, the new Lacie who NEVER starts a project without sufficient yarn in the same lot will laugh at that young, naive, Lacie) and maybe then have the courage to frog it.
But until that day I will carry on, and keep knitting the coat! I almost made the coat in Fern at first, and I think that’s what I’ll do. It’s a more natural vine color anyway.
I will fulfill my promise to document my coat, and whether you are brave (or foolhardy) enough to follow still, well, that will be entirely up to you!
Please accept my humble apologies,
Lacie
Update: Our friend Jane suggested something that may prove genius if I can pull it off - she suggested finishing the coat in Sheep’s Grey and then overdyeing it. Brilliant!
]]>
For support contact maritimefamilyfiber@gmail.com
Needles: 5mm 16” Circulars or double pointed
Yarn: Briggs and Little Heritage, 2 skeins Gold. You will use just over 1 skein, so feel free to make yours longer or wider if desired.
Cast on 100 stitches, joining to work in the round
Round 1-4: Place marker for beginning of round, Knit 1 purl 1 around.
Round 1: Purl 2, knit 16, purl 2, place second marker. The area between the markers is your cable panel (optional chart for guidance is below). Purl to end of round (first marker).
Round 2: Work cable panel as established, *knit 1, knit 1 below* repeat between ** to the end of the round.
Round 3: Work cable panel as established, purl to end.
Round 4: Purl 2, Cable 2 back (right-leaning cable), cable 2 forward (left-leaning cable), Cable 2 back (right-leaning cable), cable 2 forward (left-leaning cable), purl 2. *Knit 1 below, knit 1* repeat between ** to end.
Round 5: Work cable panel even (purl 2, knit 16, purl 2), purl to end.
You should now have established both the cable section and the 4 row bee stitch pattern. In order for the bee stitch to form correctly, you must make sure that you are alternating knit 1 belows with knit 1s, in the same manner you would a seed stitch. If you make a mistake, it’s a hard stitch to unknit, so it is recommended that you put in a lifeline. Each row of Bee stitch is alternated with a row of purling. You will now work a cable round every six rows (cable round will be the 7th round), while continuing the bee stitch as established in the bee stitch section. The bee stitch is completed independently of the cable panel, so always continue as established in this section.
Cable Round 2: Alternate cable round 1 and cable round 2 every 6 rounds. The cable round will comprise the 7th row. Purl 2, cable 2 back (left-leaning cable), cable 2 forward (right-leaning cable), cable 2 back (left-leaning cable), cable 2 forward (right-leaning cable). You will notice that these cables will complete the circular, honeycomb look.
When you have completed 16 cable rounds (or 8 “circles”) or the cowl is your desired length, end with three work-even rounds after a cable round 2. On the next round (first marker) knit 1, purl 1 around. Repeat this until you have 4 rounds of ribbing to match the beginning. Bind off loosely.
Block the cowl. You will notice the honeycomb portion tends to create a scalloped edge. You can play this up when you block, or block it out. Weave in your ends.
Special stitches: Knit 1 below is a brioche-type stitch. Instead of picking up just the new loop as you would in a regular knit stitch, you will be entering the old cast-off loop from the row below along with the new loop.
Cable 2 back: slip 2 stitches to cable needle, hold to back, knit 2, knit 2 from cable needle
Cable 2 forward: slip 2 stitches to cable needle, hold to front, knit 2, knit 2 from cable needle.
Bee Stitch Chart
Honeycomb Cable Chart
This hyperlink should bring you to a printable Word version of this pattern. If you have any questions, email us at maritimefamilyfiber@gmail.com.
]]>Our teeny community has once again, somehow, found itself pushed to the center of attention. This is something we’d rather avoid - unless it’s for a rare blue lobster, or a visit from a Stellar’s Sea Eagle, the spotlight will get on just fine without us.
But this time the lobster fishing communities are under attack, falsely so, I firmly believe. The little boats hauling traps around the inlets and outlets of the Atlantic, as they have for generations, have been painted as butchers and cruel destroyers of nature recently by various groups with various motives.
Now, when you picture environmental plunderers at sea, you may think of giant container ships, plunging over every animal in their hurried path, or huge, sometimes illegal, vessels swallowing up or poisoning all creatures in the sea, keeping the lucrative ones and dumping the dead by-catch to rot.
Maybe you feel you’ve been lied to, that these picturesque nautical scenes of families on adorable boats with their bright green traps, pipes swinging from the corners of their mouths and saltwater spray dripping from their cheery yellow bibs, was all a concoction to get you to eat more lobster? I can assure you, nothing is further from the truth. I could regale you with facts and statistics about right whale entanglements in Maine, but great resources already exist for that information (the important number to remember is 0 whale deaths due to Maine lobstermen).
Why I am breaking my policy of only good and relaxing news, is to beg on behalf of my neighbors, friends, and family, that you see for yourself that we are not the enemies. Folks with suits and titles and money are leaning toward shutting down the industry entirely to save whales which ARE in trouble, however shutting down the lobster industry in Maine is not going to help the right whales one bit. It’s hard to tell whether the fishermen or the whales themselves are the scapegoats in this scenario, maybe both. Fishermen have self-regulated and worked to make their already environmentally-friendly practices even more sustainable, so that there has been 22 years since the last interaction, in which no whales died. But closing it all down is not going to improve whale entanglements, because they are already not happening in our waters.
It happened with the sardines. I have seen even in my lifetime, the fingerprints and the ghosts walking the crumbling streets of once-booming little towns, where the elderly remember and stay, but the youth have no choice but to leave. There is a deep sadness that pervades so many of these little villages, a subconscious longing for what’s been lost. Where a trade and hope of a future was once passed down through generations, now only this silent sense of bereavement. My mother and grandmother worked packing sardines; that industry is gone.
And have you ever seen the eerie lumber mill towns for yourself? Large buildings now stand empty: homes fallen into disrepair. Another industry, another option for the youth to get involved and feel like they’ve contributed to something while feeding their families, outsourced and shut down. Not so with the lobster industry - there is still so much life and strength in those families.
What I am saying is, we have so little left. Yes, tourism is now a big industry here, and I hope our visitors always come see us so we can share the lovely summers of Maine together. I have built my business on celebrating the unique, intertwined tradition of fishing and shepherding, and how good wool goes foot-in-boot with surviving in a harsh climate. I love sharing it because the culture we have here is a beacon of hope in the world, a connection to nature, and a spot of good news in a sea of so much bad. I encourage everyone to visit Maine at least once, not only for the scenic natural beauty, but for the authenticity that we all crave when we travel.
But there’s something that’s lost in a town, region, nation, when the only industry available, the only trade to invest yourself in, is serving wealthy visitors with a smile as you struggle to make ends meet at home, and then boarding up the town (often still marketed with the quaint appeal of the fishing trade that is no more) when they leave for the long, lonely winter.
What am I asking you to do? Well, maybe there’s not much we can do. Those with the motives to close down lobster fishing have a lot more money and power than any of us. But, you can know the truth. You can share the truth. You can eat lobster from fishermen. You could even say a prayer for us.
Links to relevant info: I highly recommend reading the Time Article if you're interested in learning more.
Maine Public: Federal Judge Strikes Down by Maine, Lobstermen
The Diplomat: Labor Exploitation, Illegal Fishing Continue to Plague the Asian Seas
Time: What Sustainable Seafood Activists Get Wrong About Maine's Lobster
NPR: Cannery's Closure Marks End to Way of Life in Maine
NOAA Right Whale Take Allowances for Wind Farms
Photo Gallery: Please enjoy these selections from our fishing and sheeping family.
Though it started long before him, Floyd and Maxine Colbeth were a fishing pair, and my grandparents. Floyd lived his first years on Cross Island between Bucks Harbor and Cutler, and built infamously sturdy wooden boats until he passed away from cancer.
My sister Candace and husband Jesse are another fishing couple, with their children Jack and Hazel.
PJ fishes out of Cutler and his wife Meghan, also a fisherwoman, helps with the yarn.
Neal Sprague helps us transport sheep to and from islands on the Nancy Mae.
Shepherds Turner and Emily load up this year's lambs from Metinic Island. Metinic Island has been a sheep island for over 350 years and is currently managed by farming friend Lee Straw.
My Dad and head shepherd:
My brother Travis proudly holds up a bug:
]]>
Was Anne of Green Gables a part of your childhood? Or maybe you found the peculiarly calming tale later in life? Either way, it remains a favorite among many. One of the main themes that always stands out to me is how Anne uses observation of nature to ground herself through difficult times. The blossoming cherry tree outside her window at Green Gables was a symbol of this ability to me, and as I read through the book with my kids this last time, I had a vision of a stately lace shawl with an all-over flowery lace motif to represent the Snow Queen.
And here is that vision come to life! Perhaps you'd like to put some flowers in your hair and wrap this shawl around your shoulders whilst you stroll among the meadows. If it makes you late for chores, well, that's ok as long as Marilla doesn't notice.
(Pictured, three bosom friends)
Materials:
2-3 skeins Briggs and Little Sport (sport weight, 4 ounce skeins, 430 yards per skein)
Size 6 US (4mm) straight or circular needles (worked flat)
Begin:
Cast on 98 stitches, plus 3 selvedge edge stitches.
Note - the sample shawl is made with two skeins of yarn. If you would like to make a wider or longer shawl, the lace repeat is a multiple of 14 stitches, so you may add a multiple of 14 to make the shawl wider, and of course keep going for the length you’d like.
The lace chart only shows right side rows. All wrong side rows are purled.
Right side rows: Slip 1 stitch, work lace chart 7 repeats across, using markers as desired, to last two stitches. Purl 1, knit 1.
Wrong side rows: Slip first stitch purlwise, Purl to end.
Written lace instructions:
Row 1: Slip 1, *Purl 1, knit 3, yarn over, knit 3 together, yarn over, purl 1, yarn over, slip 1, knit 2 together, pass slipped stitch over, yarn over, knit 3.* repeat between ** to end, purl 1, knit 1.
Row 2 and all wrong side rows: Slip 1 stitch purlwise, purl to end.
Row 3: Slip 1 knitwise, *Purl 1, knit 2, yarn over, knit 3 together, yarn over, knit 1, purl 1, knit 1, yarn over, slip 1, knit 2 together, pass slipped stitch over, yarn over, knit 2* repeat between ** to end, purl 1, knit 1.
Row 5: Slip 1 knitwise, *Purl 1, knit 1, yarn over, knit 3 together, yarn over, knit 2, purl 1, knit 2, yarn over, slip 1, knit 2 together, pass slipped stitch over, yarn over, knit 1* repeat between ** to end, purl 1, knit 1.
Row 7: Slip 1 knitwise *Purl 1, yarn over, slip 1, knit 2 together, pass slipped stitch over, yarn over, knit 3, purl 1, knit 3, yarn over, knit 3 together, yarn over,* repeat between ** to end, purl 1, knit 1.
Row 9: Slip 1 stitch knitwise, purl 1, knit 1, yarn over, slip 1, knit 2 together, pass slipped stitch over, yarn over, knit 2, purl 1, knit 2, yarn over, knit 3 together, yarn over, knit 1* repeat between ** to end, purl 1, knit 1.
Row 11: Slip 1 knitwise, *Purl 1, knit 2, yarn over, slip 1, knit 2 together, pass slipped stitch over, yarn over, knit 1, purl 1, knit 1, yarn over, knit 3 together, yarn over, knit 2* repeat between **, purl 1, knit 1.
Repeat the lace chart 33 times, or as long as you’d like your shawl. Bind off.
Block vigorously!
Edging:
You can go for a simple tassel edging, or something fancier if you’d like! For the sample, yarn is wrapped around a book or similar object and then cut and threaded through in groups of 2 strands. You can see more edging ideas here, including a sturdy crochet edge.
Thank you to Ginger the cow for the modeling.
]]>The very first part knit is the cuffs. It starts with instructions to slip every stitch at the beginning of the row. I have always struggled with making this technique look neat, but I did it nonetheless.
From there, the sewing together the cuffs was a little different and I'm not sure I've done it right. The pattern asks you to make a little overlap and backstitch, not matters stitch, the ends together. I made this overlap on the inside, and after thinking about it I think it was supposed to go on the outside. I think if I had to do it again I would nix the overlap altogether, but I am knitting it as written.
After the cuffs are knit and sewed together, you pick up stitches along the cuffs. It's interesting to note it's the same number of stitches for all sizes. From this point, it's 11 inches of seed stitches for my size, so I can take a breath and relax! It’s a very squishy fabric, and I was hesitant about my yarn choice but I am loving the extra lanolin in the natural sheep’s grey color.
You can see I decided to make my sleeves two at a time on magic loop. I love doing sleeves this way as you'll be sure they are the same length!
This pattern is definitely different than the average pattern I think, but I know the finished product will be worth it, and I think the mental stretching is always good for the mind.
]]>If you ask me, I'd say maybe 40 or 50 or 60 might draw a sharp gasp, cause me to shed a tear or rethink my entire life, but gratefully 30 wasn't that!
In fact, 30 has been just exactly what I'd hoped it would be. Gone are those insecure days of the late teens and early 20s, when you're wondering what you'd do and where you'll go and who you'll be. We are so enjoying the little lives we're raising, the beautiful world around us, working with yarn and in nature, and the simplicity and steady in and out of life at the moment.
Yes, life is something to celebrate! And so off we went, down the coast and up the mountain to try our hand at skiing - something quintessentially "Maine" that I've never done before. We looked at the iconic Sugarloaf, but the high demand means that's something you'd have to plan at least a season in advance. Eventually we settled on Camden and booked a day at the Camden Snow Bowl and a stay at the Hartstone Inn and Hideaway.
The day we left was unseasonably warm, in fact it was downright peculiar! Later that day it would drop to 12 degrees, but while we skied it was 65, and many were zooming past us in shorts and t-shirts. The drive through Camden was just lovely, Maiden's Cliff towered above us over a small lake where men and women were happily ice fishing.
But when we pulled into the simple parking lot at the base of a towering hill, I almost locked my door and refused to move. Two things kept me to my course: my cheapness in that we had already purchased tickets and rented gear, and the fact that I had told all you dear people that this was something I was going to do.
You see, I had assumed we would be able to do some flat, cross-country skiing, but that was not so because of conditions. After the harrowing process of getting fitted in the proper gear and finding our instructor, I was more nervous than ever. It's worth noting at this juncture that my husband Dave is fearless and naturally skilled at anything athletic. And while I can use brute strength to wrestle a ram or shear a sheep, coordination is not my strong suit.
As I clunked my way out to our meeting place (what is with those crazy shoes anyway!?) I cut my finger on my ski boot. My blood pressure must have been high because it looked like someone shot a snowshoe hare on their poor ski slope.
Quite by accident we had booked a private, 2 hour lesson instead of the group, 15 minute lesson I intended to select. That ended up being providence's blessing, as our instructor Dale was the sweetest, most patient and encouraging person we could have asked for. He has been skiing for 63 years on this very slope, beginning at the age of 3. I remember watching videos of little babies skiing and thinking that must be something really rare, but teeny little kids were zipping past us the whole time. After actually experiencing what it was like to be on skis, I was completely shocked!
I expected to be given poles but apparently that's not part of the deal for beginners. I also didn't anticipate how difficult it was to get in and out of the skis. There was one moment where I fell forward and was so stuck I couldn't move at all. It still makes me wonder what I would have done if no one was there to help me! Eventually I was able to take a nice, slow skid down the last few yards of the slope and come to a quick stop. Dave, well he was able to ski down the big slope by the end of the day.
After our lessons and more practice, and a quick rest in the simple lodge, we headed back to our Bed and Breakfast. If you're ever in Camden, the Hartstone Inn is a beautiful place to stay. The building is beautifully decorated with paintings and art, and the food is amazing!
It was so warm we walked around, got us a coffee and headed to the Cashmere Goat to pick up some goodies.
The next day was a hard one with troubling current events beginning to swirl. But we made our way back to hearth and home, stopping at some wonderful yarn shops on our way and picking up goodies. I grabbed a lot of bulky yarn for Elsie, as she has decided to join me at the Maine Fiber Frolic to sell her knitted scarves and felted animals.
Thank YOU all for the wonderful time - for we know it's your support of our shop that allows us to do what we do! There is still more birthday fun to come, including more giveaways and also something I've had in the works for a while I am quite excited about.
There was a long, drawn-out series of mishaps and snafus in simply getting the correct needles in the brand and size that I prefer (Chiagoo, for magic loop it's my favorite) but at long last, during my visit to local yarn shops I picked up a pair at The Cashmere Goat in Camden.
And at last - I was able to cast on! I am not sure if this has happened to you, but some projects do feel a bit cursed. However, I am hoping to clear any 'bad ju ju' and get a fresh start!
The pattern starts with the sleeve cuffs, knit separately from the sleeve. It's a simple enough beginning, and I can already see that the gauge is working out to be a quick knit itself minus the details and ornaments which may be a little more time consuming.
You will notice I decided to use magic loop. For me, it's very difficult to make sure the sleeves are identical, and when the gauge is this big, every row is important. It also does away with second sleeve syndrome.
If you'd like to join this KAL late, or if you're stuck on your own Sylvi, feel free to reach out! The best was to do so is at maritimefamilyfiber@gmail.com
]]>Good morning KALers! Have you cast on yet? Or are you still deciding on colors and sizes?
I am popping in to make a note about size. A few folks had asked about sizing up to 2X or 3X, so I sent a note to the designer because while I know other folks have done this in the project notes on Ravelry, I was unable to find them only because of the sheer volume of projects and the search feature being perplexed about what I meant.
Anyway, starting a project this ornate is a big deal, and we want to make sure we have a finished product that not just fits us, but loves our fit. The beautiful thing about knitters is that we can teach ourselves how to do this.
Firstly, it's important to note that the fit of the coat is intended to be oversized, though it doesn't have to be. You will have to decide what type of fit you would like.The largest bust size is 47" which to me doesn't seem that large (but then again size is all relative) but the seed stitch is also very stretchy.
Next, find a cardigan or coat that you really love, or measure where you'd like the bust to fall on yourself, and if that measurement is more than the 47" of the largest size, you will need to size up.
The best idea would be the knit a gauge swatch (I know, I know so cliche) or use the pattern gauge listed, and calculate how many more stitches you will need to achieve that size. And where should they be put? Well, not having knit the coat myself yet, I assume there will plenty of room on either side of the floral design to add extra stitches, as well as on the fronts, backs, and if necessary the sleeves. It would be very wise to write down how many stitches you end up adding, and remember to add that to your pattern totals as you get going along.
Lastly - take a deep breath! This is a big project but it is supposed to be fun (hee hee) so remember to take it easy and enjoy the process!
Also, if you have Ravelry you can take a peek at some of the colors others have chosen here
]]>
https://www.facebook.com/groups/1100535713808296/
Why the Sylvi coat? Well, many have asked for the past few years to host a KAL for it, since the original pattern is made with Atlantic. It's also a huge undertaking, which makes it a good project to have company for! I will be honest, I've always had the thought that you can tackle any project if you take it one stitch at a time, however when I just bought the pattern and printed it off, I sort of gulp and thought I hope I'm up for leading the way on this!
But it has several things going for it: there are over 1600 projects on the Ravelry page. That means those who have gone before us in knitting the coat have made notes and taken pictures to help us along. Also, anything knit in Atlantic promises to work up quickly. Also, we will have each other to help!
Now, we will give ourselves a full year to complete this project. So we can take it slowly and easily. The first step is to choose a main colorway, in Atlantic. I think I have chosen Sheep's Grey. While it is not exactly a 'floral' tone, I feel it will show off the design well and be a good 'coat' color. I have hopes to line this coat and use it as a winter coat.
I also have an inquiry in to the designer as to sizing. It appears to be very oversized, though it only runs up to XL. The yardage calls for only goes from 12-14 skeins, so I am curious what the process for adding even more inches would be like. I would think it would be fairly easy to add more seed stitches.
If you're up for a challenge, I hope you'll join us as we knit along!
Sylvi Coat pattern: https://www.ravelry.com/people/MaritimeFamily/new_library?volume_id=404492093
]]>When choosing your own colors, feel free to be creative but make sure whatever colors you choose will provide enough contrast to show up.
Materials:
Briggs and Little Heritage
A Main Color (white, sage) 1 skein
B Brown (separation lines, apple stems)
C Fawn (mushroom stems)
D Red (mushrooms and apples)
E Black (trees on Sage hat, sheep in all)
F Bleached White/Sheep’s Grey (sheep bodies)
G Dark Green (trees, apple leaves)
B-G require less than an ounce of yarn, approx 50 yards or much less.
Ribbing: size 3mm double pointed needles
Body: size 4.5mm double pointed needles
Find yarn and more at www.maritimefamilyfiber.com
Sized for an adult head. For children’s size, go down a needle size. The fit is tight, like a beanie style hat. For a looser hat, increase your needle size, or increase the stitches by increments of 10.
This hat will want to be vigorously blocked! Also, a great colorwork tip is to hold one color in each hand. This will help keep you mindful of tension and reduce puckering.
On smaller needles, cast on 100 stitches. Work in knit 1, purl 1 rib for 5 rows, working in the round.
Work one round even in main color after chart. Break other colors and tie off.
Row 1: knit 3, knit 2 together around
Row 2 and all even rows: knit around
Row 3: knit 2, knit 2 together around
Row 5: knit 1, knit 2 together around
Rows 7 and 9: knit 2 together around
You should have about 10 stitches left. Break a long tail and thread through the stitches, sewing over the hole with the tail. Block VIGOROUSLY, preferably on a balloon.
Find a printable PDF version at this link.
]]>
There is one notable exception - and that is breeding season. Now, there isn't much for us to do other than turn a ram loose. However that becomes a little complicated - in a freezing sort of way - on the islands.
One particular winter I'll never forget. There was great excitement buzzing around the farm. We were hosting a special veterinarian to come in and 'AI' the sheep (that is, of course, artificial insemination rather than artificial intelligence). We had readied the chosen sheep with various methods from which I will refrain explanation (this story may have already gotten too odd for some of you!) and transformed our shed into a regular surgical lab.
The breeds we use are native to the British Isles, and so without new genetics they can become inbred. But there are tight laws about importing animals to prevent the spread of disease, so this importation, though costly and complicated, was and is a big deal for both our flock and the breed in the entire US.
The Doctor showed up one morning, one of the only doctors who could perform the fascinating and detailed surgery. This procedure can usually be done without surgery, but not on sheep. He came with a truckload of necessary tools. He would stay with us in the farmhouse while here, since he was from somewhere in the midwest. Perhaps I am a little foggy on the particulars, most 11-year-olds are! The snowflakes were falling thickly but the air was still. After he had unpacked, my Father asked him if he'd like to accompany us out to the islands for the ceremonious ram-drop. He nodded and off we went.
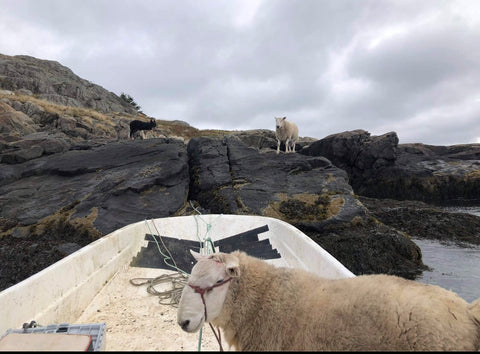
The trip to the island started like any other. We loaded the big beast of a ram onto the boat. Thankfully he was the quiet, gentle type - though I never trust a ram! The island was a short sail across the bay, to Chance's Island between Bucks Harbor and Cutler. It's a neighbor to Avery Rock, of The Lighthouse Keeper's Wife fame. The water was still and grey, and silent flakes fell all around us as the outboard on the houseless Eastporter cut through the water. Being in no hurry, we took our time, chatting about the exciting procedure to come. I was bundled from head to toe in wool, of course. Dad plotted a course with his compass, a mesmerizing black ball mounted to the steering column that bobbed smoothly with the bump of the boat.
It was all quite beautiful: serene and calming. The outboard humming almost put me to sleep as I sat comfortably in the stern, talking cautiously with the ram (did I mention I don't trust rams?)
Suddenly all went silent - yes, all. The outboard that has been happily buzzing stopped.
"Oh!" Dad chuckled. "Must have hit some seaweed. That's no trouble, I'll get it out".
He hoisted the motor as we bobbed, afloat in the great Atlantic with the snowflakes becoming ever thicker. No seaweed hung from the motor. No air in the gas line, no cracks or leaks. I've always been the anxious type, and as we ran out of simple fixes I started to get nervous. It wasn't what you call swimming weather, and either way there were no islands in sight. This was in the land before cell phones as well.
As he was elbow-deep in the motor, suddenly my Father uttered an 'ah - ha!' and the motor again came to life. We all sighed and laughed. But he soon discovered without holding some part to some piece in the motor, the engine would again sputter and die.
"You're going to have to sail, Lacie." I gulped. I'd like to tell you I bravely stepped to the wheel like a salty sea-dog and steered us there with a pipe clenched between my teeth and a yellow rubber hat, but that would be a more apt description of my sister Candace.
The Doctor remained very stoic through the whole thing. He was, after all, a doctor. I am sure he had seen many tense situations before, maybe even as tense as being sailed into the heart of the merciless sea by an eleven-year-old girl in a snowstorm.
As I sailed, the winds picked up and the flurry thickened. Soon all visibility was gone, as we were walled in by sheer white.
East I thought to myself, Just keep heading east and you'll see it!
Suddenly, like a sea monster emerging from the deep, rocks rose up in front of us. It was a terrifying sight to see the world of white interrupted by imposing cliffs, black as night and shaggy with kelp. I yanked the wheel as hard as I could, sending everybody including the poor ram and doctor careening off to port.
"Avery's Rock!?" My Dad exclaimed.
Avery's Rock it was indeed. My dad encouraged me to try again. "There's no better way to learn than hands-on experience." He said. I replied that perhaps I would like some hands-on experience with holding a motor together, and so he let me.
I held whatever those two pieces were together, thankful for my wool as the freezing spray hit me in the face and my knees grew weary of the hard bottom of the boat.
After what seemed like eons, the smooth pebbles near the ledgy bar of the lee side of Chance Island appeared on the horizon. The wind had worked the waves up considerably, and the snow kept getting thicker. As we neared the shore, I released the motor and we drifted closer. Again the silence, intensified by the thick snow, enclosed us.
We hurried around, untying the ram, who had been the calmest of all creatures on board. I will forever decry the modern myth that 'sheep are dumb'. They are not dumb, but they can be obstinate. This old boy knew exactly what a mid-winter trip to an island meant, and he was not perturbed in the least.
At this point, maybe you are a little aghast at the thought of leaving a sheep on an island. If so, you should see the blog below. I could elaborate at how islands are the perfect home for sheep to live healthy and natural lives, but you can read so here.
Anyway, all seemed to finally be looking up as the ram climbed to the top of the bow and hopped out. He turned around to momentarily see us off, then galloped off into the thick evergreens, bleating happily. Sometimes an inexperienced young ram will try to jump back in the boat in confusion, but this wise fellow was already snuffling the sheepy, salty, air joyously. We could hear muffled replies as the ewes hurried down to welcome him into the flock, muttering and rubbing noses. We stood for a moment and let the boat drift from shore, hearts warmed by the touching scene.
Suddenly the outboard roared to life, at top speed, hurtling us toward the jagged ledges. I was thrown to the stern. The Doctor sprang into action, and with one flying leap, he twisted the steering wheel hard right, which sent us into dizzying circles. He turned the key, and still the outboard churned for all it was worth (which wasn't much, but the way, and you'll be happy to know it has long since been replaced). My father tinkered and twisted and pulled like mad at the motor. It was like a carnival ride, though more wet, cold, and horrifying. At last the engine stopped.
After we worked out which way was up and down we heaved a sigh of relief and set off again. My dad made me sail us back in. This time, I managed to set a straight course for home. I was of course resistant, but he knew I needed the confidence boost. The winds died down, though the snow was still thick and visibility poor, by the time we made it home we were ready for the steaming lamb shank stew my mother had in china bowls waiting for us at the table. As we sat down and thawed, my dad asked the Doctor how he liked the boat ride.
He nodded solemnly. Half the fun of death-defying experiences for us is rehashing them over and over, so his apathetic silence was puzzling. But he retired that night, cordial, friendly, and quiet. We had a successful surgery session, then he packed up the following morning and headed home.
It was months later, when the frigid gray waters filled with slush and furor had melted into crystal blue, and baby lambs peppered the oceanside cliffs in the balmy breeze, when the Doctor's wife called us. She wanted my Dad to take them out to the island for an excursion. And - she added - she wasn't sure how we did it but she thanked us profusely for helping the Doctor conquer his fear of water. She said he had never so much as been in a pond before, even avoided large puddles, so great was his distress. But after his visit to us, he never feared the water again.
However, many others share this same experience: the calming click of our needles in the evening after a long day, the ability to control and create a project when life seems out of control, the instant solidarity of finding a stranger who crafts, or the lifelong bond of a family member who shares your hobby...
And lately I've gotten a few of those stories that I felt needed to be shared in depth, in these ladies' own words. As I encounter them, I'll add more here if they are comfortable sharing! And if you have your own story to share please feel free!
You may notice the comment sections of these blogs has erupted into spammy-link chaos resulting in me not being able to sift through the thousands of comments these people find to answer questions (seriously, does anyone ever take them up on them? sigh...) So please do write me at maritimefamilyfiber@gmail.com
First I'd like to share Haneen's words. She wrote me recently because her package arrived ripped open with no yarn...which is a sad beginning to this story! But she was graceful enough to still share with me what she had been using the yarn for, and one of her sweaters is pictured above.
"Dear Lacie,
I've wanted write you and tell you just how much this yarn of yours has meant to me this last month; however, as my most recent shipment (containing yarn to knit a sweater for my dear friend Lizzy who I believe has had the pleasure of a brief correspondence with you) was supposed to arrive this last Monday but never did, I have finally sat down to reach out.
...
And now for the matter far closer to my heart:
Nearly two months ago I sat on the corner of my mother's bed, chatting about sweaters and life and yarn. Since she taught me to knit when I was five years old, fiber, it seems, always held us closest together. We were supposed to be looking at used cars on my laptop so I could replace my dear old Civic that broke down on the long drive to visit my parents; but I think we had both had quite enough of used car listings on that late Saturday morning and, as we are wont to do in times of stress, the conversation soon turned to more pleasant things of knitting and of yarn. She reminded me again that I still had not chosen what yarn I had decided she could buy me in honor of my twentieth birthday a few months back, and so we determined to choose that at least. And I'm so glad we did, for we stumbled upon this delightful selection of wool: quality yet affordable; hearty, yet soft.
But I did not know that those twelve skeins of Tuffy would be the last yarn my mother ever bought me. I did not know that would be the last time I ever saw her.
A few more anxious weeks went by—I returned to Georgia and promptly wrecked my new ‘08 Accord; my roommate's father had a stroke; and my own mother went to the hospital. In the scurry of everything collapsing I was left alone to knit multiple fresh waves of angst and stress out of me by making the sturdiest pairs of socks.
And then, just when we thought there might still be some shred of hope, my mother was transferred to hospice. On the very same day, I tested positive for Covid, meaning my sister and I were unable to visit until our quarantine was through. But something else happened on that day, too: something beautiful, even. I opened the door and another parcel from Maritime Family Fiber lay on my porch.
I've used the phrase "stress knitting" before to describe my exercise with this craft. I've had people tell me it makes them stressed to watch me knit, and it makes me stressed to watch myself knit, too. But oh, knitting ribbed fair isle on the trim of a baby sweater while my mother was dying seven hours away and I was ill with the plague and did not know if I would even make it home in time to see her—I do not think I can put into words what a blessing that project was. I felt such an inexplicable peace throughout it all, and I doubt that would have been the case without such a complicated project and such lovely yarn to hide behind. I shall include a photo of the finished baby sweater so you may see it.
After two of the longest weeks, I was finally recovered enough and the required time had elapsed since the dreaded positive test for the hospice facility to consider letting me in. The two afternoons I spent in Room 18 were stiff and still, yet my new project's Sheep's Grey and Evergreen colorwork kept me calm. And on the evening of October 3rd, the woman who birthed and loved and raised me into the woman and knitter I am slipped through the door of this life and went forever into the arms of Jesus.
Throughout my mother's long illness with breast cancer, there have been long stretches of time in which the thought of picking up my needles was simply too much. But through the gift of Maritime Family Fiber, whatever my life is supposed to look like now, I know that the Lord wants knitting to be a part of it. It's been far too deep a comfort and a blessing to let go of now.
And because of that, I will be forever thankful.
With love,
Haneen
"But grief is not a force and has no power to hold. You only bear it. Love is what carries you, for it is always there, even in the dark, or most in the dark, but shining out at times like gold stitches in a piece of embroidery." ~ from the novel Hannah Coulter by Wendell Berry"
I have yet to read this again and not cry...hopefully it touched your heart too...thank you Haneen for being willing to share!
]]>At this point, many of you have also knit piles and piles of Fisherman's Boot socks! Here's your chance to mix it up while still enjoying everything we love about the simplicity and practicality of old-fashioned worsted socks.
Materials: 1-3 Skeins Briggs and Little Tuffy available at www.maritimefamilyfiber.com
Size US 6 double pointed needles
Sizes: women's small (women's medium) (men's medium)(men's large)
Texture pattern: Multiple of 7 stitches.
Round 1: purl 4, knit 3 to end
Round 2 and all even rounds: repeat prior row
Round 3: Purl 2, Knit 3, Purl 2 to end
Round 5: Knit 3, Purl 4 to end
Round 7: Knit 1, Purl 4, Knit 2 to end
Round 9: Purl 3, Knit 3, Purl 1 to end
Round 11: Purl 1, Knit 3, Purl 3 to end
Round 13: Knit 2, Purl 4, Knit 1 to end
In main color, loosely cast on 42(42)(48)(50) stitches using the long-tail cast on method, distributing them evenly across your needles by 2s.
Cuff: Begin working in the round in knit 1, purl 1 rib for 5 rounds, or desired length.
Begin leg texture:Starting at the beginning of the round (note, working with DPN, traditional stitch markers are tricky. Try a locking stitch marker to mark the beginning of the round, or memorize which needle begins the round.)
For sizes Men's Medium and Men's Large, decrease one stitch. (Remember you need a multiple of 7 stitches)
Work Texture pattern around until leg is desired length.
Begin Heel: If you haven't already gotten the pattern in your head, note where you are on the chart in the texture pattern. It will differ based on the size and how long you made your leg.
Row 1: *Knit 1, Slip 1 knitwise* repeat between ** 8(9)(9)(10) times, knit 1. 19(21)(21)(23) heel flap stitches.
TURN your work, these 19(21)(21)(23) stitches will be worked flat as your heel flap.
Row 2: Purl on the wrong side.
Repeat rows 1 and 2 9 (10)(10)(11) times, ending with a wrong side row.
Dutch Heel Turn: Row 1: Knit 12 (13)(13)(14) Slip 1, Knit 1, pass slipped stitch over. TURN work
Row 2: Slip 1 purlwise, purl 6, purl 2 together, TURN work*
Row 3: Slip 1 knitwise, knit 6, slip1, knit1, pass slipped stitch over, TURN work.
Continue in this manner until only the 6 center stitches remain, ending with a right side row.
Dutch Heel Instep: Pick up 9(10)(10)(12) stitches along the side of the heel flap. Work the top of foot stitches in the texture pattern, again starting on whatever row you left off.
Pick up 9(10)(10)(12) more stitches up the other side of the heel flap. Knit a few stitches from the first needle to make it more comfortable for knitting, as pictured.
Instep Decrease Row 1: Beginning on needle one (the right 'arm' of the triangle in the picture below), knit to the last three stitches on the needle, knit two together, knit 1. Knit the stitches across the top of the foot in pattern. Beginning on the third needle, knit 1, slip 1, knit 1, pass slipped stitch over, knit to end.
Row 2: Knit
Repeat rows 1 and 2 until you have 42(44)(49)(56) stitches total.
Note, the bottom/sides of the foot are worked in stockinette stitch while the top is worked in the texture pattern.
On the biggest size foot, the texture stitch is quite stretchy, so unless you are making socks for enormous feet, I would drop down to 49 stitches on the foot.
Work the foot in pattern for 7(8)(9)(12, or more for larger feet) inches, measuring from the back of the heel when the sock is laid flat.
Instep Toe: Arrange stitches so that you have 20(20)(25)(28) across the top of the foot, and 11(12)(12)(14) on each side.
Row 1: Beginning with the first needle, knit to the last 3 stitches, knit 2 together, knit 1. On needle 2, knit 1, slip 1, knit 1, pass slipped stitch over, work in texture pattern to last three stitches on needle 2, knit 2 together, knit 1. On needle three, knit 1, slip 1, knit 1, pass slipped stitch over, knit to end.
Note: continue working in the texture pattern until the decreases eat into the pattern.
Row 2:Work even in pattern
Repeat rows 1 and 2 until you have around 12 stitches left. Thread yarn through the remaining stitches. Repeat for a second sock. Weave in ends, if desired block socks on sock blockers.
]]>
And lambs are born and hit the ground growing, sheep need to be sheared and fed. Land needs to be worked; vegetables grown. It's a natural law I've found comforting, that amidst the difficult and important work to be done in the realm of human relations, nature is ever the same. Nothing can clear the mind and settle worries like a day of hard work outside, back to the basic units of life.
And spring and summer affords many opportunities to do just that on the farm! Spring begins lambing season. Our lambing season seemed to me exceptionally unexceptional, which is of course what every shepherd hopes for. We lambed on a large, grassy pasture carved out of the woods, at the end of a road by a lake. A brook provided a natural water source and islands of pines provided shelters.
Only a few notable interventions occurred, for the most part the girls had their lambs, tended to them right away, and were up and running too fast to catch (easily) in a day or two. There was an assisted birth with a happy ending, a pair of premature twins (one survived and one, despite our best efforts did not as her lungs were not ready), and a mysterious broken leg. I'm still not sure how exactly it happened, but after one of her twins broke her hind leg near the hoof, the mother sadly left her behind. But now she is the spoiled and loved Diamond Star (so named by my kids), and a very affectionate bottle lamb. Her cast is off and while her leg still looks a little stiff, she has healed beautifully. I think in ewe-hood it won't even be noticeable.
I always feel the need to add an asterisk when speaking positively of bottle lambs, simply because no matter how well they're doing there's always a danger one may bloat up and die unexpectedly. Lambs definitely do better reared naturally on their mothers. The milk is perfectly tailored to the delicate and complicated digestive systems of sheep, and it's hard to imitate well. Being ruminants with four stomachs, even the angle of the neck and height of the head while the lamb nurses are crucial to preventing bottle lamb bloat, and the angle of the mother's udder happens to be just right to prevent it as well.
But now all are born and flourishing. The mothers are sheared and happy, and in a month or so you'll have to look twice to tell those wobbly babies from their stout mothers, as they will be chunky balls of fluff with no other mission than to eat grass all day.
Yes, another lambing season is in the books, the wool has been shorn, and the hay will be baled and stored. The gardens will soon be ripe, the apples will turn red and round, and then rapidly leaves will fall and a blanket of ice and snow will again cover every inch of ground: the same cycle that has continued for eons. While for us humans, it may not have been the year we had been happily anticipating (at the beginning of the year I had declared it would be a "year of adventure" where we would go around the state and write about the wonderful places to visit in Maine and New Brunswick...tee hee...) nature continues in her same peaceful way, sifting through the seasons. I personally find solace in watching them shift, blissfully unaware.
]]>In the mouth of Little River in Cutler Maine, a stately white lighthouse sits on an island, guarding the entrance of the peaceful harbor where docked boats dot the waters and wharfs jut out from all angles. On the harbor side of the island, the waters are still and crystal, but as you round the bend, they churn and spray ferociously.
As GPS and radar have become standard on every boat - though no doubt every fisherman and her family is thankful that the technology has so reduced the amount of deaths - the brave little lighthouses have slowly become more irrelevant, until many of them across the country have either dropped into decay, been eliminated, or at best automated.
But that is not so for Little River Light! An anachronism, maybe, but the white tower still gleams and sounds on a rock at the edge of Cutler Harbor. The best part of all, is that folks may stay at the lighthouse, just as in the not-so-far-away past.
Volunteers maintain the island and keep it going. If you rent out a night on Little River, Terry will bring you out in his skiff. He'll tell you a story or two as well! He came here as many young men did, when the military bases were still active in the area. Being the easternmost point in the US, and in the government's eyes nearly uninhabited, it became a tactical position and therefore many bases, radio antennas, and the like were built.
Terry tells the story of how he would leave the base and go to the post office in the tiny village and see a beautiful young women balancing a baby on her hip and wonder to himself "Would a girl like that go steady with a guy like me?" Many parents in the area did not approve of the 'navy guys' and their lifestyle. One day, he decided to ask the postmistress if she knew the girl.
She smiled wryly, he says, and told him yes, Cynthia was her daughter and the baby was Cynthia's younger sister.
Despite the moment of embarrassment, things did work out! While Terry mans the lighthouse, Cynthia delivers the mail, and it is she that picks up your yarn dutifully every day.
A couple summers ago, my husband surprised me on our anniversary with an overnight stay at the lighthouse. Another couple had booked a stay too, both music teachers from New York.
Despite the close quarters in the cottage, there are plenty of places for relaxation and isolation on the island, and many great knitting spots! Deep in the mature wood, the mossy floor and thick evergreens obscure the sounds of the mighty waves.
Sheep used to keep the grass cropped around the tower, as I surmised since it was rich with clover still. We stayed upstairs in the little guestroom, all decorated in old-fashioned linens and china. We fried steaks outside on a fire and sat in the lawn chairs and knitted and chatted, or sometimes sat silently and listened to the waves crash. My husband also may or may not have climbed on some ledges that were inadvisable to climb, but he just does that.
Perhaps it's not the most thrilling adventure to read about, but a full two days of sitting outside and knitting while your husband brings you food is all the adventure in life I need!
You can read much more at this site about the history of the light, and also the amazing community effort the save the lighthouse from the abandon that many lights have suffered. You can also see about reserving a night for yourself too!
http://www.littleriverlight.org/
All photos used are my own, except the first one which comes from the Little River Lighthouse Website and Terry and Cynthia, used with permission. It was quite foggy while we were there, which is of course why they needed a lighthouse!
]]>The Atlantic wristers use, appropriately, Atlantic Aran weight yarn. They use 1 skein and on size 10 US needles, you could finish them in one sitting. They are also reversible, so no worries about accidentally making two left gloves...(have you ever done that? I have...Irish Knot Cables...)
Try them on double points or magic loop, either way they'll be done in no time.
Materials:
1 skein Briggs and Little Atlantic
US size 10 double pointed needles or circulars for magic loop
Cable needle
terms - cable six forward: slip 3 stitches to cable needle hold to the back, knit 3 stitches, knit 3 stitches from cable needle.
Begin Pattern:
Cast on 32 stitches for working in the round.
Round 1-5: knit 2, purl 2 to end.
Cable set up round: knit 2, purl 2, knit 6, purl 2, knit 2, purl 2, knit 2, purl 2, knit 6, purl 2, knit 2, purl 2.
Repeat cable set up round 4 additional times, for a total of 5 rounds. (10 rounds worked)
Cable round: knit 2, purl 2, cable 6 forward, purl 2, knit 2, purl 2, knit 2, purl 2, cable 6 forward, purl 2, knit 2, purl 2
Work cable setup round 9 times more (10 rows separate each cable including the cable row.)
Work cable round.
Continue in this manner (working a cable every 10 rounds) for a total of 4 cables.
AT THE SAME TIME work thumb gusset:
On the row after the second cable round, work thumb gusset in this manner:
Round 1: knit 2, purl 2, knit 6, purl 2, knit 2, purl 1, increase in purl, purl 1, knit 2, purl 2, knit 6, purl 2, knit 2, purl 2
Round 2: knit 2, purl 2, knit 6, purl 2, knit 2, purl 1, knit 1, purl 1, knit 2, purl 2, knit 6, purl 2 knit 2 purl 2
round 3: knit 2, purl 2, knit 6, purl 2, knit 2, purl 1, increase in knit stitch, purl 1, work as established to end of round
round 4, work as established to thumb gusset. Purl 1, knit 2, purl 1, work as established to end of round
round 5: Work as established to thumb gusset, purl 1, increase in first knit stitch, increase in last knit stitch, p 1, work as established to end
round 6: Work as established until gusset, work gusset even (purl 1, knit 4, purl 1)
Alternate rounds 5 and 6 until you have 10 knit stitches in the thumb gusset, while working the cable pattern at the same time.
On the next round, put the knit thumb stitches on a holder, and join the purl stitches together again. Continue to work until you have 4 cables. Repeat cable setup round 5 times after the last cable round. Cast off.
Thumb: Pick up the 10 thumb stitches with double pointed needles, and pick up two stitches on the opposite side of the thumb. Note - I often pick up an extra stitch on each side and knit them together on the first round to prevent a hole from forming on the thumb gusset.
Work knit 1, purl 1 rib for 3 rounds. Cast off.
Repeat for second glove.
Printer-friendly version here.
]]>
Last weekend, we loaded up the car with necessary items (augers, tip-ups, bait, hot dogs, marshmallows, ect.) and set off to Hadley's Lake, a popular locale. Before kids, I would have wanted to hike miles through the forest to some fish hole in the heart of the wilderness, the type of place your great grandad found in 1842 and nobody is allowed to talk about. But having little ones makes the idea of walking ten feet from the minivan to the lake more desirable! Most people even drive their vehicles right onto the lake, and usually a least a couple go through every year so, being the cautious type, we don't do that.
Despite said popularity, we were the only ones there and no footprints disturbed the snow that fell days ago, except the thin line left by a deer using the lake as a shortcut. I'm sure his flight was a quick one; a deer on a lake is vulnerable to the copious coyotes about. His track, as straight as an arrow, draws a sharp contrast to the circling, swirling, clompy tracks we leave.
We picked our day just right, and while there was still plenty of ice, the temperature was a balmy 33, no doubt part of the yearly 'January thaw'. Still, both kids and adults were bundled up like the Michelin tire man, so that we had to waddle instead of walk in the slushy snow. Wool shines here, of course.
We dug our holes, taking turns with the manual augers. Of course, there are motorized augers, as well as state of the art ice 'shacks' complete with beds, kitchens, and all the comforts of home dragged out on the ice behind a pricey snow sled. But we agreed that too much technology and ease takes something away from the moment. However, if the temperature were any lower my virtuous opinion may have changed!
In go the tip-ups, just a few,and we settle down to start a fire. The kids select suitable green branches from alders and cherries for hot dog roasting sticks and we sharpened them to a point. While they both take turns with the jig stick, burning things in the fire and downing marshmallow after hot dog for six hours is their favorite part. There's little I can say, as it was my favorite part too growing up. Who am I kidding - it still is!
Winter is still very much a time of survival for Mainers, and summer is the time for work. So there's something to be said for taking an entire day in the outdoors, busying ourselves with tasks that produce nothing besides enjoyment. We take turns playing in the snow, warming ourselves up, chatting and sometimes just sitting in silence and listening to the breeze above us in the cedars that line the lake.
The sun, behind the overcast, was rapidly setting as we packed up our gear and headed home. After we shed several layers (enough to get the seatbelts to fit us) and loaded up, twilight had deeply settled over the land. Now the bright white of the snow out-shined the sky, and the world was in mirror image for a moment.
I'd like to tell you about all the fish we caught and how delicious they were stuffed with Ritz crackers and butter with parsley and baked until crisp and flaky. However, we got skunked - this time! We couldn't even tempt a greasy old pickerel. But my pride is not hurt, for time spent with family is precious, and time spent with family outdoors, well, that is irreplaceable.
This is a question we get a lot, and for good reason! The shades are fairly similar, so why the three different colors?
Bleached White
Bleached White is the brightest of the whites. Its hand is comparable to that of the dyed yarns.
Pros: Best for dyeing brighter colors. Generally has a 'fluffier' feel.
Cons: It undergoes a little more processing than the others which is a turnoff for some, though it is considerably less than an acrylic or even superwash merino.
Washed White
Washed White is a sort of 'happy medium' between the three. As the name implies it undergoes a little more washing. It is a favorite for dyers, and the result is a cream color.
Pros: Good compromise between the two, dyes well, popular.
Cons: If you're expecting a snow-white, washed white is still not there. It's the sheep's own natural color, so it is an off-white.
Natural White
The 'darkest' of the three colors, Natural White is processed even less than the typical color. It has more lanolin and spinning oil left in. As a result, Natural White often has a spongier, more sheepy feel.
Pros: More natural and untouched, has a lovely wooly smell and a beautiful sheep color.
Cons: Because it does not undergo a final vigorous wash, it sometimes appears thinner while you are working on it, then fluffs up after washing. This could possibly throw off your gauge. Also, a word of caution for dyers: the amount of lanolin in the yarn affects how it will take the dye.
While it's hard to go wrong with any of the whites, hopefully this helps you decide which white works best for your projects.
]]>Join us as we read the book by Connie Scovill Small, The Lighthouse Keeper's Wife, and knit this shawl inspired by the humble yet intrepid life of not only Connie, but lighthouse keepers and sea-men and women up and down the coast!
]]>Fundy Bay Shawl - The Lighthouse Keeper's Wife KAL
Join us as we read the book by Connie Scovill Small, The Lighthouse Keeper's Wife, and knit this shawl inspired by the humble yet intrepid life of not only Connie, but lighthouse keepers and sea-men and women up and down the coast!
This shawl is made on size 7US needles with Regal, a heavy DK weight. It's highly adaptable and forgiving on gauge: a great project for us to enjoy together. There are some optional edging, depending on if you want to flaunt your crochet knowledge or not.
Below, just beyond that passage between the islands lies Avery Rock, where Connie and her husband tended the light on the unforgiving slice of ledge. The lighthouse was commissioned to be built by politicians who never saw the island, except on a map, and may have been oblivious to the severity of the conditions! All that remains now are a few iron poles stabbed into the rock, and the stories of adventure passed down in the form of lore.
Construction notes:
The design is worked flat (not in the round). All wrong-side rows are purled. If you are working the tassels, the cast-off edge will have a slight undulation. If this bothers you, work a couple rows of garter stitch on both the cast on edge and after the last pattern repeat.
Materials:
3 Skeins Briggs and Little Regal available here
Size 7 US straight or circular needles
Size 4.25-4.5 crochet hook for optional crochet trim
Cast on 60 stitches.
Work pattern chart for 19 repeats, or until desired length. NOTE: the chart shows the right side rows ONLY. You will be purling every stitch on the wrong side of the work.
/ = Knit two together
\ = Slip 1, knit 1, pass slipped stitch over
o = Yarn over
Tassels:
Cut 180 lengths of yarn, twice the length of desired tassels. Taking 3 strands, fold them in half and use a crochet hook to pull the loop through and make a half-hitch (bring the ends through the loop and tighten). Do this every other stitch for a total of 30 tassels per end.
Optional crochet trim:
On the end of the shawl, pick up and single crochet 60 stitches. Work 3 more rows of waistcoat (or granite) stitch. This stitch is done in the 'post' of the stitch, rather than the holes between the stitches. It gives a thicker, firmer fabric that looks similar to knitting.
Next, chain 30, slip stitch into the next stitch, still working in the post (waistcoat/granite). Repeat this for each stitch, which should give you 58 loops, ending with a slip stitch in the last stitch.
Repeat for the other end of the shawl.
Written instructions for chart:
Row 1: knit 4, knit two together, knit 1, yarn over, knit 3, repeat to end.
Row 2 and all other wrong side rows: Purl
Row 3:Knit 3, knit 2 together, knit 2, yarn over, knit 3 repeat to end
Row 5: Knit 2, knit 2 together, knit 3, yarn over, knit 3, repeat to end
Row 7: Knit 1, Knit 2 together, knit 4, yarn over, knit 3
Row 9: Knit 2 together, Knit 5, yarn over, knit 3
Row 11: Knit 3, yarn over, knit 1, slip 1, knit 1, pass slipped stitch over, knit 4, repeat to end
Row 13: Knit 3, yarn over, knit 2, slip 1, knit 1, pass slipped stitch over, knit 3, repeat to end
Row 15: Knit 3, yarn over, knit 3, slip 1, knit 1, pass slipped stitch over, knit 2, repeat to end
Row 17: Knit 3, yarn over, knit 4, slip 1, knit 1, pass slipped stitch over, knit 1, repeat to end
Row 19: Knit 3, yarn over, knit 5, slip 1, knit 1, pass slipped stitch over, repeat to end
Download printer-friendly version
]]>
Last week, I rushed through the flurries to the farm. The sheep didn't need moving, nor was I there to train Finn the border collie. I hurried my little ones through the door and unwrapped them, excited to begin a favorite activity: yarn scheming with my mother.
The kettle was already at the cusp of boiling and the tea cups were laid out, the loose leaves carefully measured in the strainer. The mellow vanilla smell of oatmeal cookies filled the house, as it usually does. We sat at the table, with a strong cup of tea to inspire our brains. My mother is equal parts charm and spice. For all the poise of her china cups and rolling pins, you'd never mistake her for demure. She always has an idea, usually yarn or sheep-related, that she'll describe with a hush to her voice and a sparkle to her eye.
No, life is not all cookies and tea parties, but one thing that works like a charm to take our minds off troubles is talking about yarn! We discussed what colorways we wanted to create next, on what bases and weights. How might someone want to use a wintry color? In a thick, worsted shawl? For slippers? Felted mittens? There's nothing like chasing down every detail and unlocking every potential of a skein and the infinite interpretations folks we've never even met will come up with.
I never want to take a second with my mother for granted. Both of us are young, but I have decided now to show my gratitude for my parents, instead of waiting until I wish I had. It's over these cups of tea that we talk about all our yarn plans, and squeal with delight over our new projects, ideas, and designs.
As we were dreaming up a colorway that would reflect ice and snow, we reminisced on the ice storm of '98. All who live in Maine remember the disaster of that time. I was 6 years old, and the winter had started like any other. But shortly after Christmas, an ice storm hit that would prove to be fatal. On January 8th, a dripping rain fell that froze in places as thick as 3 inches. It sent the multitudinous trees across Maine crashing down. For years afterwards you could see the scar on the land of twisted and fallen trees. This knocked out power to the majority of the state. Roads were impassive. Everything, including schools, shut down. A state of emergency was declared and line workers and military from across the nation poured in to accomplish the nigh-impossible task of restoring power.
We woke in the morning with no lights and cheered. We heated and cooked on our wood cookstove, so us kids were much more excited about the storm than those struggling to stay warm and tiring of cold cereal for every meal. We were homeschooled, so we still did our sums and reading. And by candlelight each night, as usual we would wind yarn into balls and knit together, laughing and talking. This was of course before the days of computers, cell phones, and internet (at least for us country folk).
We grew up enchanted by the 'olden days'. My mother instilled a love of history in us, and we eagerly listened to her stories of the past, and her mothers before her. She sewed us elegant dresses true to history. So this little adventure was a dream-come-true for us. When the power came on, we whined and asked them to turn it off again. However, not having to draw water was definitely a plus!
I love a good story of a small business succeeding and helping to nourish her community. But this time of year I start to get a little sick to my stomach, almost like after eating too many slices of chocolate raspberry pie on Thanksgiving, to be bombarded with SO much marketing, everywhere you look. I try my best to avoid being a salesperson, because by nature I am not! I received a marketing email encouraging me to "whip my customers into a frenzy" by telling them "time is running out!" It included the link to download a giant, red, flashing countdown clock, as if a bomb were about to go off.
I hope, instead of being frenzied, you are able to share a little piece of my mother's tea parties instead. That with each skein of yarn you'll receive the gift of an unhurried moment, preferably next to some cookies and tea, and with someone you love. Even better if that person also loves handicrafts! I hope this season you receive the gift of slow, and that you can trade the problems of the moment for a new cast-on or a finished project.
My Mum and I at the Machias Fiber Festival
More about the great Ice Storm here: https://bangordailynews.com/2018/01/05/news/state/frozen-in-time-memories-of-the-ice-storm-of-98/
An aside: After the storm I could remember everyone wearing these sweatshirts. I was shocked I was able to find them! I think I know what my sisters are getting for Christmas now.
]]>
Sheep frolic past rows of evergreens on these worsted-weight, colorwork boot socks.
I hope you'll find these socks a festive addition to your gift-giving, and/or your own wardrobe the year round!
After the chart, the heel and feet are the same as the much-beloved Fisherman's Boot Socks. If you need more info on sizing, reading the chatter on that pattern will help you decide which size will best fit you.
Astute observers may notice that the numbers on the chart are upside down. Have you ever tried to chart a sheep while standing on your head? Phew! It was wicked hard, and difficult to drink coffee, which is an important part of pattern writing. I could only do it so long before I decided to just draw it while sitting upright and then flip it upside down - at peril of eliciting a shake of the head from my detail-oriented fans.
Materials:
Size 4 needles
Size 6 needles
Briggs and Little Tuffy - 2 contrast colors and 1-2 skeins of main color. Available in the US at www.maritimefamilyfiber.com
Sizes: women's small (women's medium) (men's average) (men's large) The cuff is the same size for all sizes. If you need it larger or smaller, I recommend going up or down a needles size.
With Main color and smaller (US 4) needle, cast on 51 stitches. Work in knit 2, purl 1 rib for 16 rows.
Switch to size 6 needles. Knit one round in Main color, adding 3 stitches evenly (54 stitches).
Work chart.
Switch back to Main Color, and decrease 6 (5)(4)(4) stitches evenly. Knit for approximately 1 inch, or desired length
Begin Heel:
Starting at the beginning of the round (or however you want the sheep pattern to fall on the leg). Attach and begin working in contrast color (if using a contrast).
Row 1: *Knit 1, Slip 1* repeat between ** 8(9)(9)(10) times, knit 1. 19(21)(21)(23) heel flap stitches. TURN your work, these 19(21)(21)(23) stitches will be worked flat as your heel flap.
Row 2: Purl on the wrong side.
Repeat rows 1 and 2 9 (10)(10)(11) times, ending with a wrong side row.
Dutch Heel Turn:
Row 1: Knit 12 (13)(13)(14) Slip 1, Knit 1, pass slipped stitch over. TURN work
Row 2: Slip 1 purlwise, purl 6, purl 2 together, TURN work*
Row 3: Slip 1 knitwise, knit 6, slip1, knit1, pass slipped stitch over, TURN work.
Continue in this manner until only the center stitches remain, ending with a right side row.
If using contrast color, switch to main color now.
Dutch Heel
Instep:
Pick up 9(10)(10)(12) stitches along the side of the heel flap. Knit the stitches across the top of the foot.
Pick up 9(10)(10)(12) more stitches up the other side of the heel flap. Knit a few stitches from the first needle to make it more comfortable for knitting, as pictured.
Instep Decrease Row 1: Beginning on needle one (the right 'arm' of the triangle in the picture below), knit to the last three stitches on the needle, knit two together, knit 1. Knit the stitches across the top of the foot. Beginning on the third needle, knit 1, slip 1, knit 1, pass slipped stitch over, knit to end.
Row 2: Knit
Repeat rows 1 and 2 until you have 42(45)(48)(52) stitches total. Work the foot even for 7(8)(9)(12, or more for larger feet) inches, measuring from the back of the heel when the sock is laid flat.
Instep
Toe:
Arrange stitches so that you have 21(23)(24)(26) across the top of the foot, and 10 and 11(11 and 12)(12)(13) on each side.
Row 1: Beginning with the first needle, knit to the last 3 stitches, knit 2 together, knit 1. On needle 2, knit 1, slip 1, knit 1, pass slipped stitch over, knit to last three stitches on needle 2, knit 2 together, knit 1. On needle three, knit 1, slip 1, knit 1, pass slipped stitch over, knit to end.
Row 2: Knit
Repeat rows 1 and 2 until you have 12 stitches left.
Thread yarn through the remaining stitches. Repeat for a second sock. Weave in ends, if desired block socks on sock blockers (say that three times fast), and be warm.
This link will take you to a printer-friendly version.
If you need help I'll make sure you get a copy of the pattern, just email me at maritimefamilyfiber@gmail.com
The inspiration for these forest-browsing sheep comes of course from my own. Those of you who know me, know I work on my parents' sheep farm where I grew up. The sheep are sprinkled all over the county on both the mainland and islands. The reason for this is of course that, as the old folks always said, in Maine the field is but borrowed from the forest for a time. You must mow your fencelines and dooryard or the evergreens will start emerging from every side. Yes, Maine soil loves to grow trees! But grass is what we need for sheep, and so we capture every mouthful we can by rotating them around to find it.
My home serves, as of now, as a sort of 'sick bay' where cossets, orphans, and those needing a little extra attention come and then are released back into the flock when they are strong again. When I have sheep here, they love browsing through the forest. You can tell where they've been, as they tidy up under the trees, giving them the feel of a Christmas tree farm.
We leave early in the morning, though not nearly as early as the 4 o'clock launch time of the lobster fishermen. Many of them are already back on the moorings at 7 when we load up our gear and set off.
The air smells characteristically like that fresh, salty smell it takes on only in the heat of summer. My grandfather Floyd, a fisherman and wooden boat builder, told us kids that smell meant the lobsters were coming soon. It's sort of reminiscent of cucumbers or freshly cut hay, but with a twang of old bait and outboard oil.
I take my spot by the motor as we all settle in, on buckets and various bits of boards and dunnage. Being careful to not break headway speed in the harbor, we pass boats of all shapes and sizes, from dingys to sternless monsters. We have the usual chat about who's fishing and what they're up to.
It's always an assortment of folks we take to the islands. Usually there are a few kids from the village and friends. I remember when I was young several times each summer children would come walking down the long driveway, or we'd see a car drive away after letting off a few small passengers. They'd tell us their parents told them to 'go to the farm for the day'. These free farm hands usually had dubious job experience, but we put them to work anyway. Today Abigail and her grown brother Jacob join us, and lucky we are, as they're experienced help!
The large barges, nets, and bouys of the salmon factory are the last things we pass as we emerge between Bar Island and Dry Rock. In front of us lies the bay between Bucks Harbor and Cutler. The ocean is a mirror, completely undisturbed but for our snowy wake behind us. Normally I'd hang on and ride out the bump, bump, bump on the floor of the boat as we hit the frothy waves, but there's no need today. Islands pass, thickly coated with evergreens and uninhabited but for a lighthouse here or there. Their image is reversed beneath them, reflected perfectly in the water.
We land in Craven Cove off Foss Island, taking care to miss the seashore ledge and the gunning rock. It's a great place for a seal to take a nap or for a duck hunt, but also for tearing out the bottom of a boat! Foss island has historically been a sheep island, meaning it contains much grass, shelter, fresh water, and easy access to endless seaweed. Oftentimes the Flora and Fauna are just a bit different out on the islands, as the trained eye may notice. There are many large purple and sparkly rocks that fascinated me as a child. Well, I guess they still do!
We lug our gear up the beach and choose a flat spot for shearing. It's always nice to pack the bare minimum, as slippery trips up the rockweed have resulted in many a gash or bruise. So, we bring our handshears and do a bit of blade shearing for these ladies.
We have a textbook gather - you couldn't ask for a smoother one. We sweep the island and once we discover the sheep, we swoop them toward the pen where they are successfully funneled in. Of course we owe much of our thanks to Jack, the clever border collie. A quick leap from Jacob and the pearly white ewes are safely captured, each with a gleaming lamb by her side.
We congratulate each other on a successful gather as we ready the blades and stretch out our backs. Jacob is a fledgling shearer as well, so between the two of us the pen is clipped in no time. Abigail and her father are apt wool handlers, making the shearer's job that much easier. The island wool is unbelievably creamy and beautiful, we call it 'foam rubber' for that's what it looks like coming off the back.
The tide is close to turning and our haul-off anchor is reaching the end of its rope, so as we finish up shearing we decide to let her beach and have a dinner of hot dogs on the shore and wait for the tide. The smattering of clouds against the blue sky looks like a fresh batt of roving. I am coated from the top of my head to the tip of my toe in lanolin, grease, and sheep, but it doesn't seem to matter out here. After the girls are all clipped, checked out and given a clean bill of health, we let them go. Some leap through the aperture, others saunter slowly up the hillside, nibbling and blatting as they go. We get a smudge going, just enough to roast a few red hot dogs on sticks, slather them in mustard and chomp them down.
The hesitant tide gives us a few moments to poke around the ledges, looking for a dulse snack. Covered in draping seaweed, I've always thought them imposing and other-worldly figures: oddly-shaped and at times impossibly large. The ocean carves strange shapes from the rocks, like an eccentric artist.
I'm a tad disappointed when the slap of the waves reaches the boat and floats her, signaling it's time to leave, for I had been in the middle of spinning a skein of yarn from the discarded dags using a rock as a spindle. The busyness of motherhood seldom affords the pursuit of unproductive relaxation, but the best of days draw to a close just the same.
The sail home is a tad choppier as the changing tide rips through the channels, but this time instead of splintered old boards I rest on a bag of fluffy wool. Between the comforting smell of lanolin, the soft up-and-down of the waves, and my tired muscles, it's all I can do to stay awake. This is perhaps the best part of an island adventure, returning safely to home with our wool treasures neatly sewn into burlap, ready to be washed, flicked, carded, twisted, knitted, woven, punched, and otherwise fretted-over until it becomes a beloved handmade item.
Appendix A, a thrilling assortment of curious island rocks:
(A natural sock blocker maybe?)
Until next time,
Lacie
]]>These Heritage Star mittens are the next free pattern in our Christmas KAL! They are quick and cozy, a perfect gift.
The origin of these mittens is a little curious! A while back, a lady posted a mysterious picture of a pair of mittens, rustic and covered in traces of snow, and begged for anyone to be able to replicate them. Like many searches for patterns from random internet pictures, I was never able to find the pattern, so we made our own. The popularity of them took off and it seemed like that's all I knit for a solid year.
Of course, I cannot lay claim to the Nordic star! In fact, if you're curious about that symbol, here's a lengthy but fascinating article detailing its origins.
Materials:
Size US 8 needles double pointed
3 ounces Briggs and Little Heritage worsted yarn, plus contrast color
Cast on 36 stitches, 12 per needle. Join to work in the round, place marker at beginning of round if desired. Knit 1 purl 1 around for 18 rows of ribbing.
Increase round:
Increase 1 by knitting in the shoulder of the stitch on the lefthand needle, knit 2, increase 1 in shoulder of last knitted stitch on the righthand needle. (5 thumb stitches) Knit even around. You may also use your favorite right-leaning and left-leaning increase, respectively.
See an explanation of this type of increase below. (Asking as you don’t mind dirty fingernails, after all it’s weeding season!)
Knit 1 round even.
Repeat increase round, increasing in the same stitches as before to create a v shape and increase the number of stitches for the thumb, until you have 11 thumb stitches total. Work thumb even.
AT THE SAME TIME
After 5 rounds of stockinette/thumb increases, FOR THE LEFT MITTEN knit 3 stitches after the thumb stitches, begin colorwork chart. FOR THE RIGHT MITTEN, knit 13 stitches after the thumb stitches, begin colorwork chart. As you work the chart, you will be bringing the colors behind rather than carrying them across. To keep fingers from snagging on the threads, pick them up with the working yarn (without knitting them) occasionally to hold them into the work.
On the 12th round of the chart, place the 11 thumb stitches on a holder. Cast on 2 stitches in its place, continue working chart.
After chart ends, knit 8 more rounds.
Decrease round: Knit 2 together around.
Knit 1 round.
Repeat decrease round.
Thread yarn through remaining stitches, sew in end.
Thumb: Pick up 11 thumb stitches. Evenly pick up 4 more on the opposite side of the thumb. Note: I like to pick up 1 extra in the spot a hole often occurs and then knit it together with the thumb stitches on the second round to avoid the hole.
Knit for 14 rows.
Decrease round: knit 2 together around.
Repeat decrease round once more. Thread yarn through remaining stitches, sew in end.
Block thoroughly. If you've worked with traditional wool in colorwork, you know the more roughed up the mitten gets, the better the design looks. The mittens in the picture are fresh off the needles and after one blocking are still a tad stiff. In the past I have used lopi for the color to get an even more 'fluffed' look.
Knitting in the shoulder on the left hand needle:
Knitting into the shoulder of the right hand stitch:
Here is a text/chart only version for printing.
I also discovered something interesting, after waking up at 4 one morning, bleary-eyed and confused. I stumbled toward my yarn wall thinking a bit of knitting would help wake me up. I chose what I thought was Dark Grey in Heritage, and after about an hour of knitting I realized it was in fact Regal in Midnight Blue. That's all to say, you can knit this pattern in Regal if you add a few rows before and after the chart!
]]>Each stocking uses two skeins of Briggs and Little Heritage (or Tuffy) worsted weight yarn. It is a heavy worsted yarn.
Each year lo about September, many folks wanting to carry on the tradition call me looking for yarn for Christmas stockings that were knit eons ago by a family member. There were several popular colorwork patterns that were very beloved in years gone by. I hear many touching stories of grammies making socks for grands and great-grands even!
I've gotten quite a few laughs when I tell folks I'm knitting Christmas stockings in July, but each year in December I wish I had them and by then it's too late.
Materials:
Size 8 US/5.00mm double pointed needles
2 skeins Briggs and Little Heritage
Begin at cuff.
Cast on 96 stitches. Work in Knit 1, Purl 1 rib for 20 rows. Now, flip the bottom of your work up to your live stitches. Pick up a stitch from the cast on edge and knit it together with the corresponding live stitch.
This part is easier than it sounds, but if it's too intimidating go ahead and keep going and just sew the cuff down later.
Set up for cable pattern: *knit 4, purl 4, knit 4, purl 4, knit 12, purl 4,knit 4, purl 4, knit 4, purl 4* repeat between ** once more.
Work as established for 4 rounds.
Cable round 1: *Cable 4 back (slip 2 stitches to cable needle, hold to back, knit 2, knit 2 from cable needle), purl 4, cable 4 back, purl 4, cable 6 back (slip 3 stitches to cable needle, hold to back, knit 3, knit 3 from cable needle), Cable 6 forward (slip 3 stitches to cable needle, hold to front, knit 3, knit 3 from cable needle), purl 4, cable 4 back, purl 4, cable 4 back, purl 4* repeat between ** once more.
Work as established for 8 rounds.
Cable round 2: *cable 4 back, purl 4, cable 4 back, purl 4, knit 12, purl 4, cable 4 back, purl 4, cable 4 back, purl 4* repeat between ** once more.
Work as established for 8 rounds. Repeat these two sequences (alternating cable round 1 and cable round 2 every 8 rows) until you have 13 small cables and 7 large horseshoe cables.
Heel:
Beginning at start of round,slip first 6 stitches (a small cable and 2 purl stitches) to the end of last round. knit 1, purl 1 for 32 stitches. TURN WORK and begin working the heel flap flat. Purl 1, knit 1, to end. Work 22 rows of seed stitch, purling the knits and knitting the purls, ending with a wrong side row.
Turn the Heel:
knit 20, knit 2 together, knit 1, turn.
slip 1, purl 12, purl 2 together, turn.
slip 1, knit 12, knit 2 together, turn.
Continue as established until there are no 'side' stitches left, ending with a right side row.
pick up 12 stitches along the edge of the heel flap. These stiches will become "needle 1".
Knit as established in cable pattern across the top of the foot. There will now be 2 purl stitches, 3 small cables, 1 large horseshoe cable, and 2 more small cables, and 2 purl stitches across the top of the foot. "needle 2"
Pick up 12 stitches along the other edge of the heel flap. "needle 3"
Knit a few stitches from needle 1 to needle 3 so it forms a comfortable triangle.
Place marker to mark the beginning of the round if you wish.
Instep Decrease round: Knit to last 2 stitches on needle 1, knit 2 together, knit 1.Work as established in cable pattern for needle 2. On needle 3, knit 1, slip 1, knit 1, pass slipped stitch over, knit to end.
Work instep decrease every other round, working even as established on the off rounds until you have 94 stitches left. Work as established for 7 more small cable rounds, or until desired length, ending 4 rows after a cable 2 round.
Toe Shaping:
Set stitches up so that you have 24 stitches on needle 1, 47 stitches on needle 2, and 23 stitches on needle 3.
Knit to last 3 stitches on needle 1, knit 2 together, knit 1. On needle 2, knit 1, slip 1, knit 1, pass slipped stitch over. Work in pattern until last 3 stitches, knit 2 together, knit 1. As you decrease on needle 2, work in pattern until the stitch is decreased. On needle 3, knit 1, slip 1, knit 1, pass slipped stitch over, knit to end.
Repeat decrease round every other round, continuing to work the cable pattern across the top of the foot as long as you can.
When you have 34 stitches left and you are 8 rows after a cable 1 round, divide stitches evenly between 2 needles and kitchener them together.
Hanger Loop:
Working with 2 needles, cast on 5 stitches. Work these stitches in an I-cord (slipping them back to the front of the needle and pulling the yarn tightly across the back of the work to form a tube) for a few inches, about 36 rows. Cast off and sew the loop to the stocking in the middle of the horseshoe cable that goes up the back of the heel.
]]>
The second free pattern in our Christmas KAL is for the littl'uns: a snake friend suitable for snuggling, playing, bopping siblings over the head, and using up scraps of yarn. It uses Briggs and Little Heritage, worsted weight yarn.
I started making these snakes whimsically without following a pattern and each one was a tiny bit different to start, but the 'winning' adjustments are reflected in the pattern. I plan on making one for each of the 11 of my nieces and nephews who are young enough to appreciate them. I am seven snakes in with only four left to go!
When subbing yarn take care to match the gauge on the tighter side. When making toys, a tight gauge is important, not for finished size reasons, but so the fabric will keep the stuffing in place and not shed. A snake with a 27 inch body will use just about one skein of Briggs and Little yarn.
To hear more chatter and pattern notes, scroll to the bottom!
Materials:
Size 3mm dpn
Briggs and Little Heritage approx. 4 ounces, 215 yards
a small amount of red yarn for tongue
Polyfill/stuffing
safety eyes
Gauge: 5 stitches and 8 rows per inch
Begin at tail:
Cast on 6 stitches, then divide them evenly among three needles. Join to work in the round. Knit 15 rows. When comfortable, add a marker to mark the beginning of the round.
Increase round: Knit to last stitch, increase in last stitch, repeat for each needle.
Knit 10 rows more.
Work increase round.
Now, repeat increase round every 6th row until you have 11 stitches per needle (33 stitches).
Work even until snake measures 27 inches, or however long you'd like her!
If you’re making stripes, make sure you use the jogless technique by picking up the shoulder of the first stitch on the second row of the new color and knitting it with the live stitch.
Work head:
Increase in each stitch around.
Work even for 3 inches.
Divide stitches accordingly: 16 stitches on first needle, 33 stiches on 2nd needle, 17 stitches on last needle.
Add safety eyes and stuff the snake firmly enough to be used as a weapon by toddlers (or, you know, not). I used waste wool from spinning for some of the snakes.
I noticed it was easier to add the eyes as you were knitting where you wanted them: it’s easier to make them straight!
Decrease round: Knit to last 3 stitches on first needle, knit two together, knit one. On needle 2, knit 1, slip 1, pass slipped stitch over, knit to last three stitiches, knit two together, knit one. On third needle, knit 1, slip 1, pass slipped stitch over, knit to end.
Repeat decrease round every other row, knitting even on the odd rows, until you have 18 stitches left. Knit two together around (9 stitches). Begin icord tongue: Arrange the stitches like the second photo below (on one needle). Change to red yarn, knit first two together so you have 8 stitches. Knit an icord tongue by knitting one row, slipping stitches to the end of the needle and bringing the yarn across the back, knit the row again, forming a tube.
To fork the tongue, keep 4 stitches on hold. Knit 1, knit 2 together. knit remaining 3 stitches as an icord for 7 rows. cut yarn and thread through remaining stitches
Repeat for remaining 4 stitches.
Chit Chat:
You'll notice some of these snakes look different, and that's because I was just sort of going for it before I decided to write the pattern. That's usually how I go about designing patterns! If you're curious, the brown snake most closely follows the pattern, as do the scrappy snakes.
My daughter came up with the idea for this photo...she tends to be a tad macabre for a five year old...
Fun fact though, Maine has no poisonous snakes! That's worth the snowstorms to me.
]]>This week calls for celebration on many levels - mother's day was well spent by many including new sheep mothers with wee lambs at their flanks, we launched a new website without any computers exploding (literally and metaphorically speaking), and the 12th marks TWO years that Maritime Family Fiber has been at it. 🥳🥳🥳🥳🥳🥳
Now, it's time for our second Christmas/Holiday KAL! This year I'm adding another component as well, featuring a winsome way to wrap or present each handmade gift. So often when the glitz of the season rolls around, our slowly and deliberately crafted items seem dull and lifeless next to the shiny, inflatable offerings at the dollar store. However, we know that after the plastic and cardboard has been tossed away the most used and cherished gifts tend to be the home made ones. And certainly after our loved ones themselves are gone, those are the vestiges we cling to.
This simple little duck couple might not seem magnanimous beneath the tree, but I proudly display them year-round to remind me of my grandmother, who taught me how to crochet.
But this year let's dress those hand-made gifts in worthy attire! For our first gift, the free Reversible Boot Topper Sock pattern, I've found this absolutely adorable deer wrapping paper from Craft Berry Bush. It's free, you just download it at her site. It comes in multiple colors too. How sweet!
I've made two pairs of these toppers in Mulberry and Fern, and I am currently working on a pair in Red Heather. I love how they fit and I think they are going to be practical and stylish this winter.
Though it may be hard to envision frosted sugar plums at the moment, (and yet they are calling for snow here tomorrow) we'll appreciate this pile of gifts come December. Presently, there are little lambs dropping here and there, a busy time of year for the shepherd.
This little man, about a half-hour old, waits patiently for his checkup while mom looks on. The best way to handle a birth is as hands-off as possible. There is a short window of time after birth where the maternal bond is cemented, and human involvement during that time can cause a ewe to reject her lamb. We stand by in case she needs help, then after the lamb is born we ear-tag the lamb (required by law and for organization), shorten the navel and spray with iodine, give a pump of minerals if needed, and give them back to mumma. She is equipped to provide him with everything he needs to grow strong and healthy.
Davey looks on an assisted birth.
]]>
Have you ever worn boot toppers and went about your day stylishly but felt slightly disingenuous? You know what I mean: it looks like you’re wearing a long pair of deliciously cabled, cushy wool socks but only you know the truth: it’s a mere band of 6 inches or less.
Ok, so maybe it’s less of a moral conundrum and more about practicality after all. With these boot topper socks, you can have the best of both worlds: a reversible cabled topper band with a comfortable thin sock included. It's a great accessory that your family and friends probably don't have - making it the perfect start to our Holiday KAL! Make these for Mom, sisters, nieces, even a fashion-forward gentleman in your life.
The cuff works up quickly on large needles in Atlantic 3-ply, making the rest fly by in Durasport (not Sport, you need some nylon!) after that. Customize the length of the ribbed cuff according to the height of your boot. So for a low boot, you would do no ribbing or just a couple rows, and for a taller boot you would measure until just under the top of the boot. The cabled cuff can be folded down too!
Materials:
1 Skein Briggs and Little Atlantic, available at www.maritimefamilyfiber.com
1 Skein Briggs and Little Durasport, also available at www.maritimefamilyfiber.com
1 set size 8 US/5mm double pointed needles for cuff
1 set size 2.5mm double pointed needles for sock
Sizes: Women’s small (women’s average)
Begin Cuff:
Cast on 56 stitches in Atlantic on larger needles, join in the round. Adjust stitches by multiples of 4.
Round 1: Knit 4, Purl 4 around.
repeat round 1 until you have 4 rows.
Cable Round: *Slip 2 stitches knitwise to a cable needle, hold to back, knit 2 stitches, knit 2 stitches from cable needle. Slip 2 stitches purlwise to cable needle, hold to back, purl 2 stitches, purl 2 stitches from cable needle.* Repeat between ** around.
Rounds 6-13: repeat round 1.
Round 14: repeat cable round.
Repeat rounds 5-13 2 times more, for a total of 4 cable rounds, or more if you desire.
Repeat round 1 4 times more, change to Durasport and size 2.5mm needles.
Ankle:
Round 1: knit around
Round 2: Knit 2, Purl 2 around.
Repeat round 2 until desired length. Ideally this should be customized to your boot height.
Heel flap:
Beginning on the next round (right side), Knit 1, slip 1 15 times, knit one more stitch. 31 heel stitches.
TURN your work now, and work just these heel stitches back and forth to create the heel flap, purling on the back side and knit 1, slip 1 on the right side, as established in pattern.
Work 31 (35) rows, ending with a purl side row.
Turn the heel:
Knit 21 stitches, slip 1, knit 1, pass slipped stitch over knit stitch, turn work.
Slip 1, purl 12, purl 2 together, turn work.
Slip 1, Knit 12, slip 1, knit 1, passed slipped stitch over.
Repeat these last two rows until only the center 12 stitches remain, ending with a right side row.
Without turning work, pick up 15 (18) stitches along the edge of the heel flap, knit across the top of foot stitches, pick up 15 (18) more stitches on the other side of the heel flap, knit a few stitches from the heel turn so that the sock forms a comfortable triangle. Mark the center of the heel flap stitches as the beginning of your round.
Gusset (foot decrease):
Decrease round: Working in the round once more, knit to the last three stitches on the first needle, knit 2 together, knit 1. Knit top of foot stitches even. On the last needle of the round, knit 1, slip 1, knit 1, pass slipped stitch over, knit to end.
Next round: Knit all stitches.
Work these 2 rounds until you have 64 (70) stitches. Work these stitches even until the foot measures 7.5 (9) inches from the heel, or until it reaches the end of your pinky toe when you try it on.
Toe Decrease:
Arrange stitches so that the first needle has 16 (18) stitches, the second needle has 32 (35) stitches, and the last needle has 16 (17).
Round 1: Knit until the last three stitches on needle 1, knit two together, knit 1. Moving to needle 2, knit 1, slip 1, pass slipped stitch over, knit to the last 3 stitches, knit two together, knit 1. On needle 3, knit 1, slip 1, pass slipped stitch over, knit to end.
Round 2: Knit.
Repeat these two rounds until less than 20 remain, slip yarn through needles and secure on the inside. For a kitchener toe, you'll need to start sooner, just make sure you have an even number of stitches on each needle and that it's centered.
Enjoy!
]]>