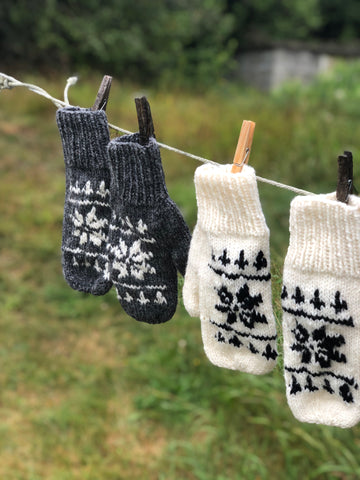
Heritage Star Mittens

These Heritage Star mittens are the next free pattern in our Christmas KAL! They are quick and cozy, a perfect gift.
The origin of these mittens is a little curious! A while back, a lady posted a mysterious picture of a pair of mittens, rustic and covered in traces of snow, and begged for anyone to be able to replicate them. Like many searches for patterns from random internet pictures, I was never able to find the pattern, so we made our own. The popularity of them took off and it seemed like that's all I knit for a solid year.
Of course, I cannot lay claim to the Nordic star! In fact, if you're curious about that symbol, here's a lengthy but fascinating article detailing its origins.


Materials:
Size US 8 needles double pointed
3 ounces Briggs and Little Heritage worsted yarn, plus contrast color

Cast on 36 stitches, 12 per needle. Join to work in the round, place marker at beginning of round if desired. Knit 1 purl 1 around for 18 rows of ribbing.

Increase round:
Increase 1 by knitting in the shoulder of the stitch on the lefthand needle, knit 2, increase 1 in shoulder of last knitted stitch on the righthand needle. (5 thumb stitches) Knit even around. You may also use your favorite right-leaning and left-leaning increase, respectively.
See an explanation of this type of increase below. (Asking as you don’t mind dirty fingernails, after all it’s weeding season!)
Knit 1 round even.
Repeat increase round, increasing in the same stitches as before to create a v shape and increase the number of stitches for the thumb, until you have 11 thumb stitches total. Work thumb even.
AT THE SAME TIME
After 5 rounds of stockinette/thumb increases, FOR THE LEFT MITTEN knit 3 stitches after the thumb stitches, begin colorwork chart. FOR THE RIGHT MITTEN, knit 13 stitches after the thumb stitches, begin colorwork chart. As you work the chart, you will be bringing the colors behind rather than carrying them across. To keep fingers from snagging on the threads, pick them up with the working yarn (without knitting them) occasionally to hold them into the work.
On the 12th round of the chart, place the 11 thumb stitches on a holder. Cast on 2 stitches in its place, continue working chart.
After chart ends, knit 8 more rounds.
Decrease round: Knit 2 together around.
Knit 1 round.
Repeat decrease round.
Thread yarn through remaining stitches, sew in end.
Thumb: Pick up 11 thumb stitches. Evenly pick up 4 more on the opposite side of the thumb. Note: I like to pick up 1 extra in the spot a hole often occurs and then knit it together with the thumb stitches on the second round to avoid the hole.
Knit for 14 rows.
Decrease round: knit 2 together around.
Repeat decrease round once more. Thread yarn through remaining stitches, sew in end.
Block thoroughly. If you've worked with traditional wool in colorwork, you know the more roughed up the mitten gets, the better the design looks. The mittens in the picture are fresh off the needles and after one blocking are still a tad stiff. In the past I have used lopi for the color to get an even more 'fluffed' look.
Knitting in the shoulder on the left hand needle:


Knitting into the shoulder of the right hand stitch:


Here is a text/chart only version for printing.
I also discovered something interesting, after waking up at 4 one morning, bleary-eyed and confused. I stumbled toward my yarn wall thinking a bit of knitting would help wake me up. I chose what I thought was Dark Grey in Heritage, and after about an hour of knitting I realized it was in fact Regal in Midnight Blue. That's all to say, you can knit this pattern in Regal if you add a few rows before and after the chart!


What is meant by bringing the colors behind please? And is the chart repeated around the mitten or just on top?
i knit to i think she meant left behind or in front is if we carry to colors at same time we need to use dark color first and kept in in front at all times and light is in back because if not your knitting will not be neat looking for customer to see the good work of us
I am stuck at the instructions to “bring the yarns behind” instead of carrying them around. Help!
Lacie are these male or female size? Can I make them for children? And is there a pattern for kids size? Thanks
Hi Lacey – I also need an explanation of what you mean about carrying the yarns behind. I am familiar with colorwork and would normally catch the floats. Can you please clarify this?
Thank you